
Table of Contents
CalcTape for Windows
The User Interface
The user interface of CalcTape is designed with simplicity in mind. The largest area is the editor where you make your calculations. To the right there are the num pad and the custom buttons, at the top there is the menu bar which offers functionality like the search function or changing settings like the mode of the editor.
Creating New Documents
To create new documents you can use either the new document symbol on the title bar or navigate to File → new. Alternatively you can also use the shortcut “ctrl+n“ to create a new document.
Calculations
Simple Calculation
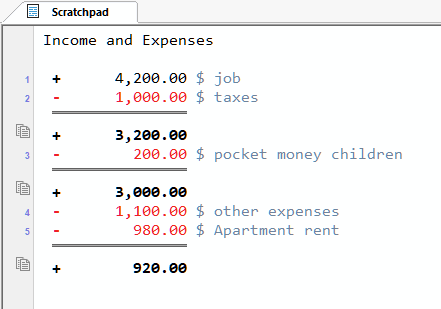
Calculations can be made quickly and easily with CalcTape. To enter a calculation you can input numbers and operators using the num pad or by using the keyboard. When an “enter”-key is pressed or the “=”-button on the num pad is clicked the result of the calculation will be shown under a double line.
Several Calculations on one Page
CalcTape is designed so that you can have several calculations in a single document, so that it is not neccessary to open a new document for each and every single calculation. To start another separate calculation just insert an empty line after your existing calculation by pressing the “enter” key two times or clicking on the “=”-button on the num pad. You can now start entering a new calculation.
Interim results
Interim results are created by pressing “enter” on the keyboard or clicking th “=”-button on the num pad. You can easily distinguish them as there is a double line over them. There also appears a box if you click on the result. Left of the line a copy-icon is shown. By clicking on this icon the value is copied into the clipboard so that they can easily be pasted into other documents. To copy the value without digit-group separators hold the “ctrl”-key when clicking the “copy”-icon.

Modify calculations
CalcTape allows values in a calculation to be modified without deleting all of the calculation. Just change or delete the line you wish to modify. The result of the calculation is updated automatically. CalcTape can also be used as a text-editor. Just switch the mode in the menubar to Text Editor mode. You can edit the calculations like in a normal text-editor, add or delete lines or splitting or (re)uniting calculations and simple copy&paste actions.
Percentage calculation
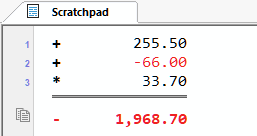
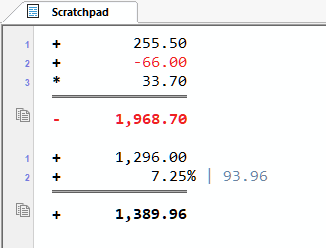
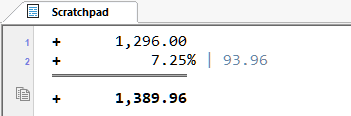
In addition to the four basic arithmetic operations CalcTape can also do percentage calculations. This is an easy way to do tax-calculations or the like. If you want to add VAT to a given value just enter the value,the addition-symbol and the VAT-percentage (currently 19% in Germany) followed by “%”. Then press “enter” or click the “=”-button on the num pad. The calculation will now be processed and the absolute value of the percentage will be shown as a comment.
Adding Notes and Comments
Another feature of CalcTape are the comments and notes for calculations. Text can be written above and below each calculation as well as right of the calculation to comment individual lines.
Saving Documents
A document can be saved by clicking on the save symbol in the title bar or by navigating to File → save. Alternatively you can use the keyboard shortcut “ctrl+s” to save a document.
Custom Buttons
What are Custom Buttons?
In CalcTape for Windows you are able to create buttons with customized formulas or texts. This enables you to set up buttons which are not part of the standard num pad but which are valuable for your everyday use.
Adding new Custom Buttons
In the standard CalcTape Layout there are two predefined custom buttons below the num pad (“+ TAX” and “- TAX”). When clicking on the “arrow down” button on the right-hand side of the button a menu opens in which you can choose to edit the button, delete it or add a new custom button (The number of custom buttons is limited to two in the free version of CalcTape). If you choose to add a new button a new window appears where you can enter a caption, a hint and text. The caption will be the label of the button, the hint will be displayed as a tooltip when the mouse hovers over the button. The text-field contains the formula or text which will be inserted in the calculation when you click the button. Clicking on “OK” saves the custom button and adds it to the custom button panel.
Click here for an example of how to add a Custom Button.
Settings
The settings offer several ways to change the appearance of Calctape and options to set up the editor according to your preferences.
The “format” submenu contains settings to adjust the number of decimals, digit grouping, indentation and rounding behavior of the editor.
The “general” submenu contains graphical settings “Style”, “paper”, “colors” and system settings in “language” and “options”.
The “Options” submenu is used to activate and deactivate the following features
- “Touchscreen”: The buttons in the NumPad, Custom Buttons and Variables Controls are larger for easier use on Touchscreen devices
- “Run at Startup”: A CalcTape-session starts automatically when Windows starts
- “Check for Updates Every Week”: as it says
- “Restore Workspace”*: All Documents which were open at the end of the previous CalcTape-session will be opened at the start of the application. The tabgroups and their layout will also be restored.
- “Autosave”*: when modified documents (marked with a “*” in their tab) are closed they will be saved under their current name without query.
*only in the pro version
Hiding Control Panels
Control elements can also be hidden so that there is more space for the editor on the screen. By clicking on the pin symbol in the upper right corner of the control panel they get pinned to the closest side. When the mouse hovers on the title, the control panels slide out automatically and disappear again when you move the mouse out of the zone of the control elements. Clicking on the pin a second time makes the panel permanently visible again.
FAQ
Rounding Behavior
The default rounding behavior setting in CalcTape is to round the results. If you want to change the rounding behavior you can do this by clicking on settings. In the submenu “format” choose from the options “Round Nothing”, “Round Results” and “Round All” by clicking on the “arrow down” symbol to the right of “Round Results”.
Changing the Decimal Mark
The settings for decimal mark is bound to Windows and therefore you need to make a system-wide change. You open the Windows control panel, select first “Region” and then “more settings”. There you have the possibility to change the decimal mark. The changes will be active after restarting CalcTape.
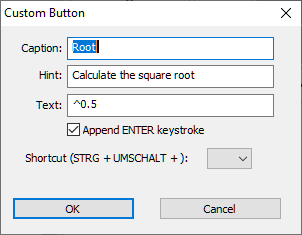
Adding new Custom Buttons – Example: Extracting a root (Pro Version)
Click the “arrow down” button of a predefined custom button and choose “Add New Custom Button”. A new window appears where you can create the new button. In the field “Caption” type “Root”, below at “Hint” enter “Extracting a root” and in the field “text” input the formula “^0,5”. With a click on “OK” the new custom button will be saved and can be used in calculations.
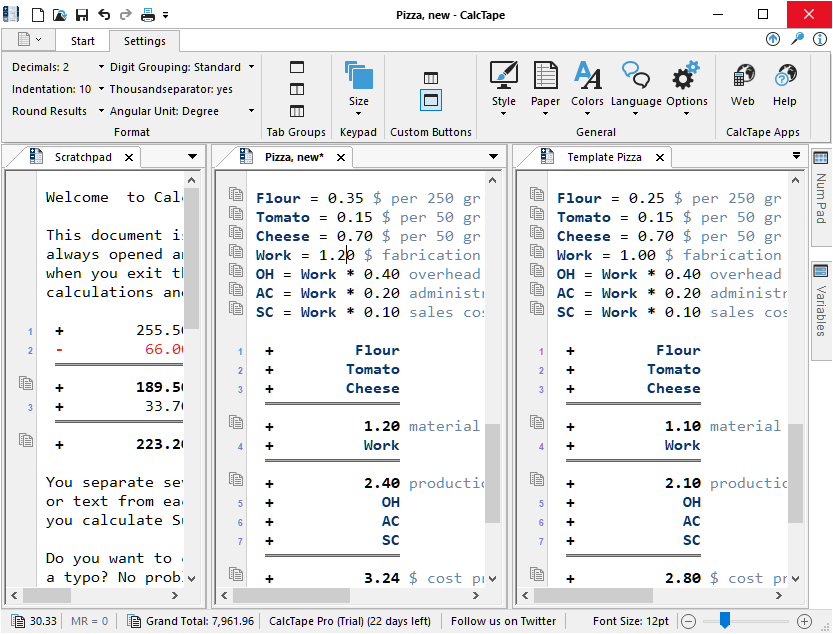
CalcTape Files as Templates
Using saved CalcTape documents gives rise to the opportunity to use them as templates. This is useful both in business as well as in private contexts when similar calculations are made with differing values. The following example shows the prime cost calculation of a pizza. When the value of a variable is changed the calculation will be updated accordingly and the new result will be displayed.

Printing
For printing CalcTapeDocuments either use the keyboard shortcut “ctrl+p” or navigate to File → Print. The pro version of CalcTape offers additional printing features, e.g. adjust margins, header and footer.
Pro Version
To activate the CalcTape pro version navigate to “File” → “activate Pro”. By purchasing CalcTape Pro you get additional features like the scratchpad, variables, additional printing functions, more than two custom buttons, multiple document support and more. There is also an option to test CalcTape Pro for 30 days for free.
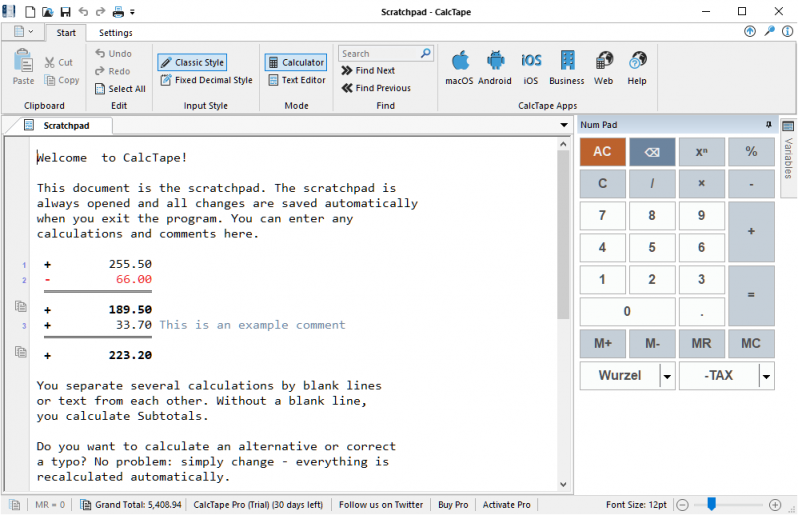
Scratchpad
The scratchpad is a document which is opened all the time and saves all your inputs automatically.
Use of Variables
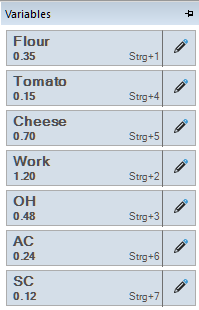
Variables are a feature of CalcTape Pro. The freeware allows the usage of variables only within the scratchpad.
Here is an example of how to assign and how to use variables: There are two ways to assign a value to a variable. The first way is simply to type a variable name followed by an “equals” sign followed by the value the variable is assigned to.
Example: InterestRate = 3.5

The second way is used only when a result is assigned to a variable. In this case the value alredy is in the line, just enter “=” and the variable name behind the value. There are a few restrictions on variable names to remember: variable names must start with a letter and must not contain any special characters (_ and numbers are allowed). When the variable is assigned the variable name will be blue colored (color can be changed in the settings) so that variables can be identified at a glance. Changing the value of a variable is easy: Just edit the value in the line where the variable is assigned. There is also a variables panel (left of the num pad panel in the default layout). Clicking on the variable name on the button in the variables panel inserts the variable in the current position of the cursor. Clicking on the pencil sets the cursor to the line where the variable is assigned. The rightmost part of a variable button is to assign keyboard shortcuts for the variable.
Multiple Documents Support
CalcTape Pro allows several open documents at the same time. In addition it can display up to three open documents side by side in tabgroups, which makes it easy to compare calculations. The settings of this feature are located in “start” → “Tab Groups”
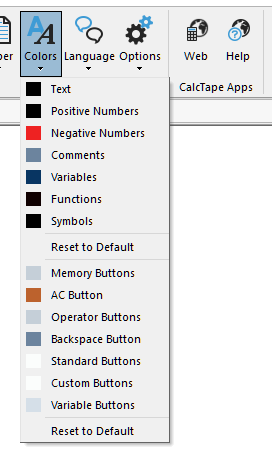
Changing Text Colors
Getting CalcTape Pro means getting more color into the editor. Negative values are displayed in red, comments in green, making calculations easier to read. All color settings can also be adjusted in “Settings” → “Colors”
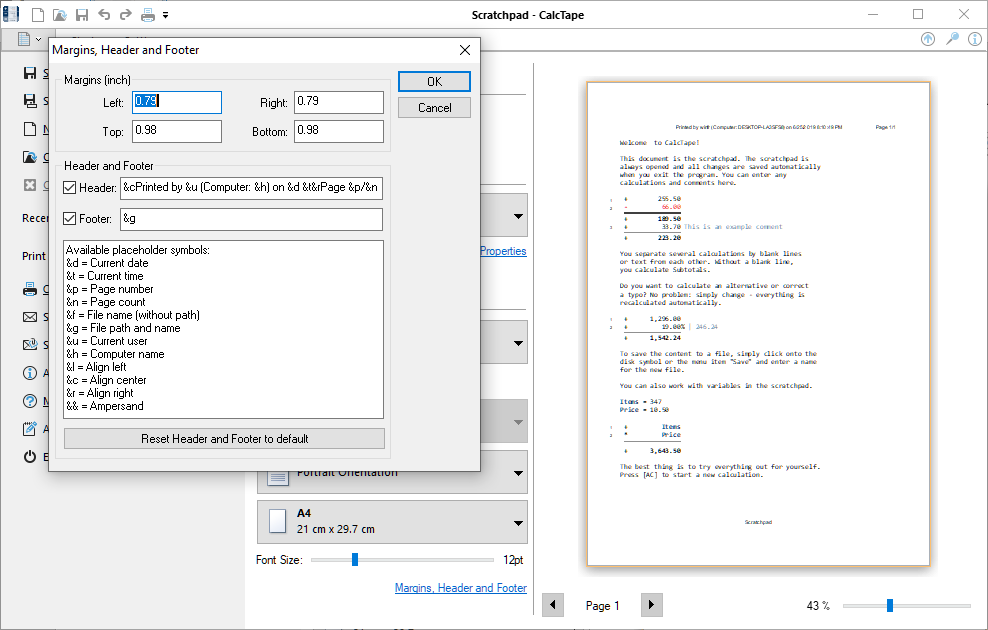
Printing
As described above, with the pro version there are more functions to the print option. Margins, header and footer can be set.
Buying
The pro version of CalcTape for Windows can be bought on the website schoettler-software.com or directly from within the application. For this please navigate to [File → Activate Pro] and either insert the activation code or click on “Click here to buy CalcTape Pro”.

Minor upgrades within the bought versions are free of charge (e.g.: Upgrade from Version 6.0 to Version 6.2).